Experiment files
This page describes the different configuration files a Neurorobotics experiment is made of. For a detailed description, please refer to the Specifications section of this manual.
An experiment is a sub-directory located in your storage space. You can access to it via the My Experiments tab of the web application, see Clone an experiment and start a simulation.
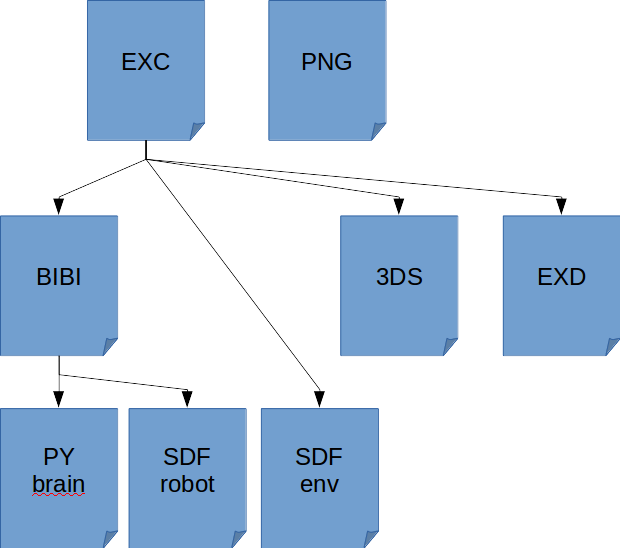
MyExperiment.exc : Called the "Experiment Configuration file".
                   It holds high level information such as name, description, timeout, environment model, ...

MyExperiment.png : The experiment thumbnail image.
                   This image is displayed on the web cockpit client on the experiment list

MyExperiment.3ds : Graphical settings.
                   This file stores web cockpit rendering settings, which are generally edited within the user interface.
                   You can though also edit it manually.

MyExperiment.bibi : The "BIBI" file.
                    This file references the brain model to use, the robot model, and definitions of transfer functions

MyExperiment.exd : Experiment design file.
                   It defines state machines in python to automate your experiment life
These files reference models from robot, environment and brain libraries. They reference each other and can be named freely. Libraries are:
Robot library in ~/.opt/nrpStorage/USER_DATA/<user name>/robots. Robot files are Gazebo SDF (.sdf) files.
Environment library in ~/.opt/nrpStorage/USER_DATA/<user name>/environments. Environment files are Gazebo SDF (.sdf) files.
Brain library in ~/.opt/nrpStorage/USER_DATA/<user name>/brains. Brain files are PyNN python (.py) files.
The indicated paths are only valid if the Neurorobotics platform is installed on your computer. In any case, we encourage you to manage experiment files by means of the file manager of My Experiments tab, see Clone an experiment and start a simulation.
Experiment configuration file
This is the main file for the experiment, in xml format.
Extensive documentation on this file can be found in the user manual. Only the tags that are user definable are described here. The rest of the file should remain untouched.
<name> : Name of your experiment as it will be displayed in the Web Cockpit

<description> : Short text (of about 50x6) characters describing the purpose and scientific interest of your experiment.
                This is displayed in the Web Cockpit, in the experiment list, when your experiment is selected

<timeout> : In seconds, this value sets the maximum lifetime of your experiment.
            It will automatically shut down when the time out is reached, unless the user adds extra time when prompted.

<configuration type="3d-settings"> : Set the path to the 3DS file in the src field.

<maturity> : Set to development to make your experiment available only in Web Cockpit's development user interface.
             Set to production to make available in regular users' interface.

<environmentModel> : Set path to your environment SDF file in the src field.
    <robotPose> Tag sets the initial position of the robot within the environment (in absolute coordinates).

<bibiConf> : Set path to BIBI file in the src field.

<experimentControl>
    <stateMachine> : Leave type attribute as "SMACHStateMachine".
                     Set id attribute to any name you like.
                     Set src attribute to the path of your EXD file.

<cameraPose>
    <cameraPosition> : initial position of the user's camera (user point of view on the scene).
    <cameraLookAt> : initial angle of view of the user

<rosLaunch> : set the path to a launch file for additional ROS nodes for this experiment in the src field

<rngSeed> : set an RNG seed to use every experiment launch, if not specified a random RNG seed is used instead

<gazeboLockstep> : boolean, if specified, denotes the activation status of gazebo's "Lockstep of physics and sensors" feature, see https://gazebosim.org/tutorials?tut=lockstep_physics_sensors
Experiment thumbnail file
This file should be a PNG 370x248 image. It is displayed as a thumbnail in the experiment list.
It should be explicit about your experiment, ideally a good screen-shot.
User settings file
This file, in JSON format, defines graphical rendering settings and navigation settings as well. In general, you will prefer to set it using the graphical settings editor, as explained in the user manual. If you want to edit the file itself, then here are the tags descriptions.
shadows : "true"/"false". Turn on/off shadows

antiAliasing : "true"/"false". When enabled, it will smooth the pixels to avoid pixel aliasing.

ssao : "true"/"false". turn on/off ambient occlusion
    ssaoClamp : float. Distance to ambient occlusion.
    ssaoLumInfluence : float 0 to 1. The lower, the darkest the shadow.

rgbCurve : color correction.
    red : array of "[x,y]" dots on a spline curve that defines the red profile. If empty, the profile is linear.
    green : idem
    blue : idem

levelsInBlack : float 0 to 1. lower level for histogram normalization
levelsInGamma : float 0 to 2. mid-tone level for histogram normalization
levelsInWhite : float 0 to 1. upper level for histogram normalization
levelsOutBlack : float 0 to 1. lower bound for 2nd level normalization
levelsOutWhite : float 0 to 1. upper bound for 2nd level normalization

skyBox : path to sky box images in the assets (usually predefined and selectable in graphical editor)

sun : empty or "SIMPLELENSFLARE"

bloom : "true"/"false". Enable bloom effect.
    bloomStrength : float 0 to 1. Strength of bloom effect.
    bloomRadius : float. Radius of bloom effect.
    bloomThreshold : float 0 to 1. Intensity level threshold for bloom effect.

fog : "true"/"false". Enable fog.
    fogDensity : float. Fog density.
    fogColor : hexadecimal RGB.

pbrMaterial : "true"/"false". Enable PBR materials.

defaultCameraMode : "free-camera"/"lookatrobot". The camera will follow the robot motion if "lookatrobot" is selected.
cameraSensitivity :
    translation : float 0.05 to 2. Control the translation increment of the camera when moved through GUI
    rotation : float 0.1 to 2. Control the angle increment of the camera when rotated through GUI
BIBI file
The Brain and Body Interface (BIBI) file is in the XML format.
An extensive documentation on the BIBI file can be found in BIBI Model Specification and BIBI Configuration Tutorail.
<brainModel>
    <file> : Path to the brain model file
    <populations> : Defines neuron populations. Should match the population in your brain file.
        population : Attribute set to "sensors" or "actors" or "record", depending on the neuron type.
                     "type" set to "Range" or "List".
                     If set to Range, you have to set the "from" and "to" attributes.
                     If set to List, you have to set the "element" attributes.

<bodyModel> : Path to the robot SDF file.

<transferFunction> : Defines a transfer function. The regular type of transfer functions is "PythonTransferFunction".
                     In that case, the transfer function can be defined in a separate python files referenced in the "src" attribute, or entered as python code in the <![CDATA> element.

                     Set the type attribute to "Neuron2Monitor" to monitor neurons.
                     Their spikes will be displayed in the spikes pane in the Web Cockpit, and logged.
                     "name" attributes is the name of this special transfer function.
                     <device> should be set to type="SpikeRecorder" and the neurons to record should be defined with the <neurons> element with a Range attribute, as in the population attribute of <populations>.
Experiment design file
The EXD file is a Python file that uses the SMACH state machines framework.
Writing a state machine for an experiment describes how to set up these state machines.